Posted on 4 Comments

Colorful Copic & Art Squares Blog Hop

Welcome to the Colorful Copic & ART SQUARES blog hop!

You are in for treat today as Copic pairs up with the ever popular Art Squares by Inchie Arts. There are so many things to love about this pairing!

Did you know:
Art Squares are the perfect canvas for creating small-format art!
They come in 6 sizes (1 inch, 1.5 inch, 2 inch, 3 inch, 4 inch, and ATC).
Art Squares come in 7 colors (black, dark gray, light gray, kraft, dark cream, light cream and white).
They are perfect for wet or dry mediums.
Copic markers and inks look amazingly vibrant and deliciously rich on Art Squares!
Copic multiliners glide smoothly across the surface.
Work on the “top” or toothy side for the best results.
You can mix and match your mediums! No warping, bending or curling.

You can find more information about both Copic products and Inchie Art Squares at the links below.

Copic Website

COPIC Main Logo

All In An Inch – Inchie Arts Blog

Inchie_ArtSq_Logo_light

Our teaching and design teams have been challenged to put marker (or ink) to these precision-cut matboard surfaces and see what happens! (You are not going to BELIEVE these samples… trust me – they rock!)

I have 3 cards to share with you today.  I had way too much fun with my squares and can’t pick just one to highlight.  In addition to the 3 below I am going to post my other creations with my Inchie Art Squares and Copic over the next few days.  I am starting with 3″ Kraft colored squares.  Tomorrow I will be sharing 2″ white squares and Sunday will highlight 3″ white squares and a few more Kraft squares as well!

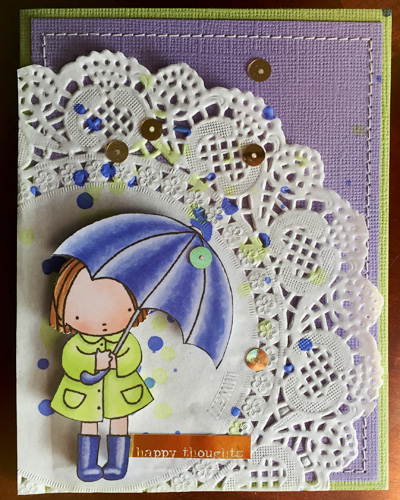
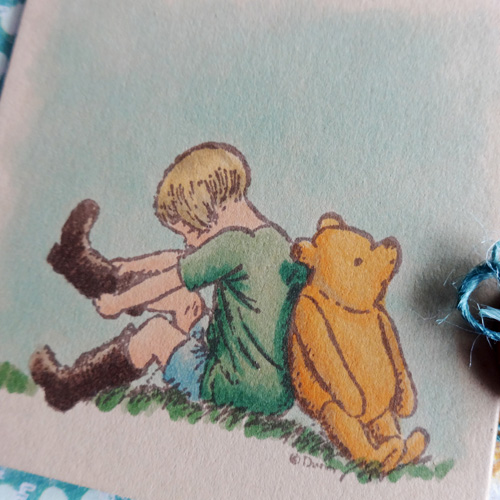
This fist card uses very traditional color techniques with Copics.  I stamped the image with a Memento, Rich Cocoa stamp pad and then used the following colors; Y35, Y38, Y28, B91, B95, G20, G24, G28, E43, E43, E47, Y21, Y28, YR00. E93, YG63, YG66, B00, BG000, 0.  Notice in the color selection a lot of my lighter colors are not present, the Kraft be did effect my color choices here.  Blending was extremely easy and happened mostly as I was coloring making it un-necessary to go back and blend layers.

Inchie hop 2


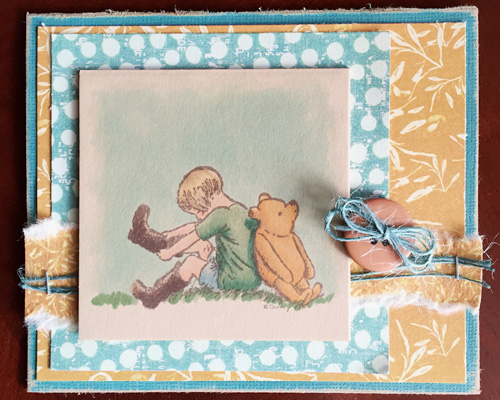
Other supplies:  cardstock; Core’dinations, patterned paper; Prima, twine; American Crafts, tiny attacher; Ranger, button; Unknown.  Here is a close up of the image.

Pooh and Cristopher close-up


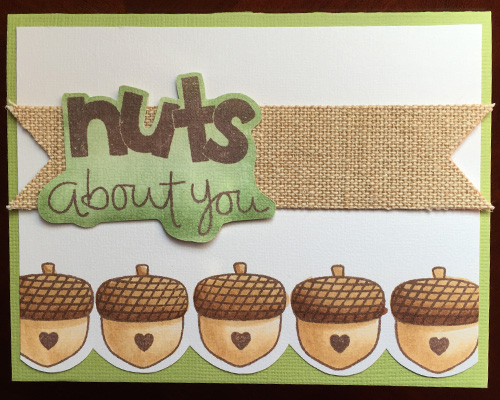
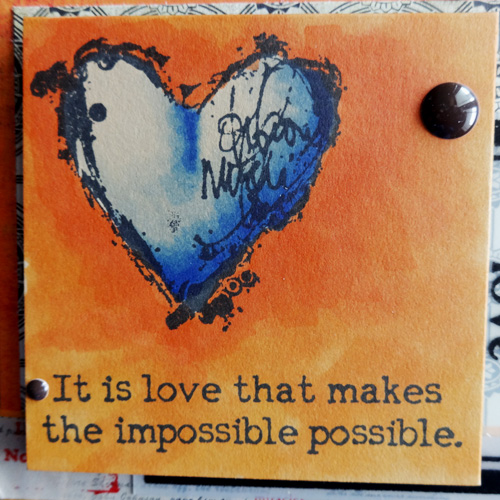
This next card is using stamps by Dina Wakley and Ranger.  I used a much looser coloring technique,after stamping with Memento Tuxedo Black, lots of scribbling, overlapping and no back blending. I used B60, B63, B66, B69, Y38, YR04, YR07.

Big heart 1


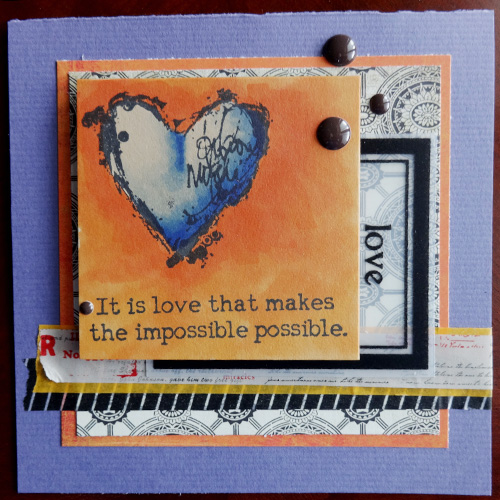
Other supplies used:  cardstock; American Crafts, patterned paper; Basic Grey, journal card; Maya Road, Washi tape; Freckled Fawn, Target office supplies and unknown, dots; My Minds Eye. Here is the close up:

Big heart 1 close-up


The last card I am sharing today is again featuring a Dina Wakley stamp (The extra black on the bird’s belly is poor stamping on my part, not part of the stamp, sorry Dina!).  The colors used on the bird are Y17, E02, E04, E09, E29.  On the bird I used the marker loosely to show the texture of the bird.  For the background I used my Various Ink Refills in RV66, V04, V17, And used them with a brush and colorless blender like watercolor paints.  It created the beautiful mottled background for my birdie.

Bird 1


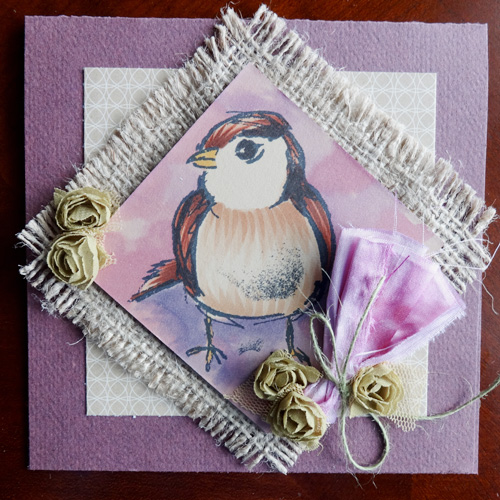
Here is the close up of my coloring.  I also Copic died the silk that is tied into the pink flower.  Other supplies: cardstock, twine and flower trim; American Crafts, patterned paper, Basic Grey, burlap; Canvas Home Basics.bird 1 close-up
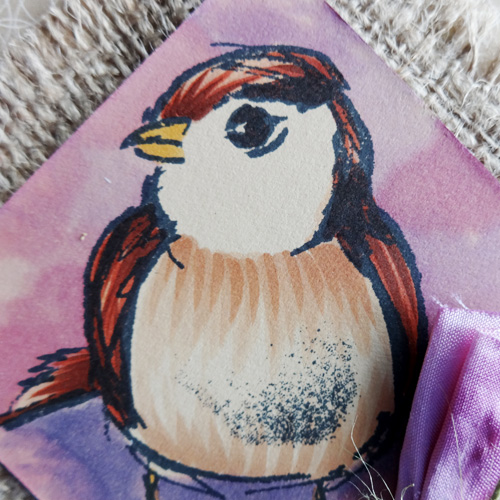
Hop along with these talented designers as they show you some more interesting and exciting ways to pair up two great products!

Elizabeth Allan & Jill Foster

Michele Boyer

Lori Craig

Sharon Harnist

Michelle Houghton << You are here

Dina Kowal

Cindy Lawrence

Lisa Lee

Debbie Olson

Colleen Schaan

Sherrie Siemens

Marianne Walker

Happy Coloring! And come back both Saturday and Sunday to see more Copic and Inchie Art inspiration!

Posted on

Winner!

Random.org just helped me select a number!  #14 you win!

Debbie McKelvey please shoot me an e-mail (you can click on the envelope in the group of icons at the top of my right hand column) with your address and we will send you a new Copic T-shirt!

Thank you everyone for stopping by this weekend and welcoming Jennifer to our Copic team!

Happy Colorful Monday!


Posted on 26 Comments

A Colorful Copic Welcome!

It’s our pleasure to welcome Jennifer Dove to the Copic Fine Art Teacher Team!

What exactly is the Fine Art Teaching Team and what will Jennifer be doing with Copic? Well, the Fine Art Teaching Team is made up of a number of professional artists and instructors who travel across the country demoing and teaching at fine art stores and art schools. Jennifer has already been busy booking demos and classes in her area!

Jennifer has been using Copics since 2010 and her passion and enthusiasm are apparent to everyone she works with. As an artist by nature, Jennifer is currently busy teaching Copic Boot Camp retreats, working on her own DoveArt Designs stamp line, and designing in mixed media, jewelry making, card making and altered arts. She also has a number of video classes available with Annie’s Publishing. She is very excited to be adding this new teaching venture into her line-up.

We know that Jennifer will ROCK THE SOCKS OFF of those art schools and stores and we are so thrilled to be able to welcome her to the Copic teaching family.

IMG_2053 - Version 2

To see more of Jennifer’s work, check out her blog at just4funcrafts.blogspot.com
In celebration of Jennifer’s joining us, we want to give YOU a chance to celebrate too. Our current Papercrafting Teacher Team has joined up for a welcome hop and we are EACH giving away a Copic T-Shirt to one lucky winner. Make sure to add a comment on this blog post to be entered to win.  I will cut off entries midnight Eastern Sunday, February 8th and will announce the winner Monday evening!

T-Shirt

Visit the blogs below for your chance to win & make sure to stop by Jennifer’s Blog and give her a big welcome!

Lori Craig
Jennifer Dove
Michelle Houghton <<<YOU ARE HERE
Cindy Lawrence
Debbie Olson
Colleen Schaan
Sherrie Siemens
Marianne Walker

And here is a little Copic fun to send you on your way.  I created this card this past week with the color challenge #14 over at My Favorite Things.

MFT color 14Supplies: cardstock; Bazzill Basics, doily; Bo Bunny, image; My Favorite Things, sequins; Jenni Bowlin, ink; Copic C3, (colors used E35, E37, R000, R01, R20, YG000, YG01, YG13, B60, B63, B66)


Hope you have a happy, colorful weekend!


Posted on 1 Comment

MFT Sketch Challenge 212 – Closing in on Seattle Copic Workshops

Well I figured I would keep coloring while I was n a roll so here is another card I completed for the on-going challenges over at My Favorite Things.  This is my interpretation of this week’s sketch challenge:

Sketch 212 MFT


I kept it pretty simple today, to me the fun part was using the acorns to form my scallop at the bottom edge. 🙂 Supplies:  cardstock; Bazzill Basics and American Crafts, ink; Memento (Rich Cocoa)  and Copic (YG61, YG63, E50, E53, E55, E57, E59), burlap banner; Little Yellow Bicycle.

We are coming down to wire for my Copic Workshops in Seattle.  If you or anyone you know live in the area and would like to join me for a half day, full day or even two full days of coloring fun make sure to get signed up NOW before it is too late.

Happy Coloring!

Posted on

Flat Geometry

I had a great time playing with my latest challenge over at Get It Scrapped.  A group of us each created a page with an image made out of “flat geometry”, a current trend in design.  Basically we are trying to show dementia and form with two dimensional geometric shapes.  I decided to add a rocket using flat geometry to my layout that was leftover from sprig break of 2013.  I am back tracking and trying to fill in some gaps in my scrapbooks and maybe get a little caught up even.  It is a lofty goal even if it remains just a goal.  Here is a close up of the rocket:

blog flat geometry

I colored strips of paper using Copic markers so that I could get a nice value range in my blue hue, then I cut them all into triangles and quadrilaterals, leaving them in little piles of similar color.  I sketched out a rocket shape on a scratch piece of cardstock and cut it out then glues all my little pieces onto the rocket base, filling it in.  I tried to use value cues to show the cylinder shape of the rocket body, and the cone of the nose.  You can see the flames that I created on the full layout below:

flat geometry


Blast Off by Michelle Houghton | Supplies: cardstock; American Crafts, patterned paper; Pink Paislee, Heidi Swapp and SEI, letters; Pebbles, ink; Zig and Copic

I had set all the papers aside with photos a while back so I had supplies I was hoping to use already to go.  The rocket was the perfect piece to tie it all to gather with a wonderful unique handmade touch!

Check out all the flat geometry looks HERE

Happy scrapping!