Posted on

Gasenfude…WHAT?

No I am not learning a new language, believe it or not there is a brand new pen out from Copic! It is a nylon brush pen that is compatible with Copic inks! Yippee Skipee, let’s play!

Now let me share first and foremost that the new Gasenfude pen has it’s own learning curve and needs as much practice to master, maybe even more then your Copics depending on what yo would like to do with it.

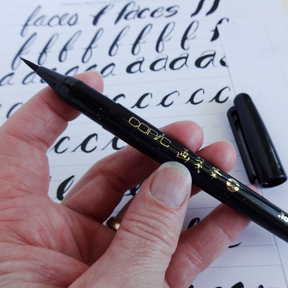
Here are the details before I show you my play time:

  • Archival
  • 9 mm long bristles
  • 3.1 mm diameter at brush base
  • Water based, black pigment ink
  • Sturdy, genuine nylon bristles
  • Superfine point for detail work
  • Long, flexible bristles for dry-brush effects
  • Copic compatible ink (will not bleed with Copic markers)

Good stuff right?! So I decided to challenge myself and try my hand at some brush script. It is all the rage you know and really how hard can it be? (She says to herself with some confidence) I’ll be honest, harder then it looks, and took more practice then I anticipated. But like any new adventure oh so very fun! Here is the breakdown of what I ended up with.

Blog 1

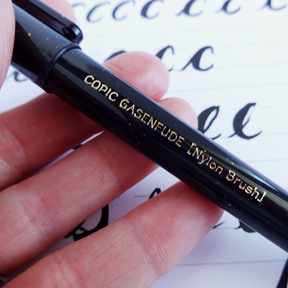
Take a closer look at the pen, I’ll check the spelling 🙂

Blog 2

This shot gives you a closer look at the long nylon brush nib.

Blog 3

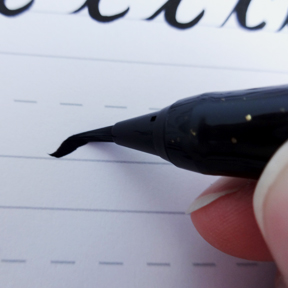
It flexes even further then the Super Brush Nib on the Copic Sketch markers. Practice Practice!This style of lettering is ALL about pressure. Press down to get thicker lines, ease up to get thinner lines. Speed is a HUGE factor as well, keep it slow, I mean SUPER SLOW!

Blog 4

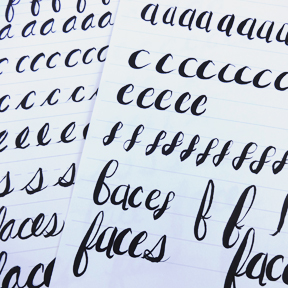
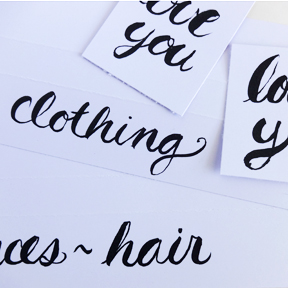
I started with a lot of individual letters. For time, I focused on letters I knew I wanted to use. I looked up a couple different styles on line to get some ideas, but ended up using a style that is mostly my own handwriting.

Blog 5

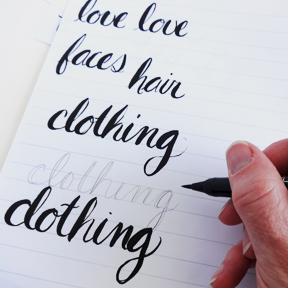
Yep more practice! and now focusing in on words. Some of my letters link like a cursive style others do not connect, like a standard print. I worked on lined paper and also did some work in pencil first to look at where I wanted thicker areas on each letter.

Blog 6

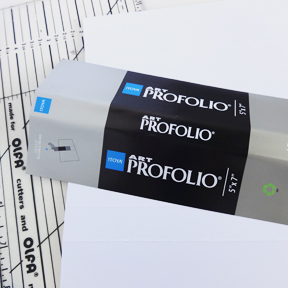
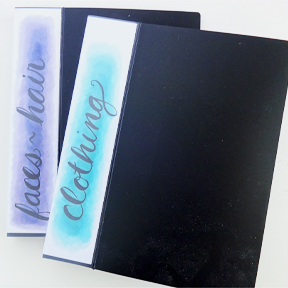
Now on to a project. I am going to add labels to my Copic portfolios. I pulled out the paper from the sleeve around the binding to get measurements. I used a pencil, clear ruler, paper trimmer and bone folder.

Blog 7

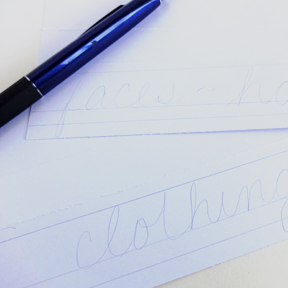
Here are my labels cut, folded, with guide lines and very light writing to give me a better shot at spacing.

Blog 8

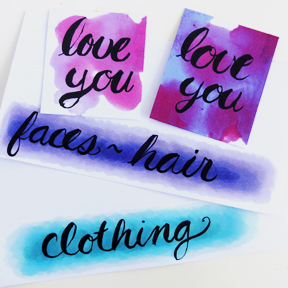
Next ink it up with the new Gasenfude and erase all the pencil lines after the ink drys. I couldn’t resist making a couple of extra little tags with the scrap paper.

Blog 9

Best part of Gasenfude…compatible with Copic ink! Yay! Color, color, color!

Blog 10

Yep loving it, takes practice and patience, I am not there yet, but I am loving it!

have a happy colorful week!

Posted on

Copic Calendar Updated 4/6/2016

I just updated all the Copic Classes that are open across the US and Canada. There are more to come, but these are the classes that are currently open for registration RIGHT NOW.  Check them out in my side bar or HERE is a direct link.

Two weekends to take special note of (they are all important, but these two are worth mentioning). One there is a brand new Certification weekend added to the calendar in my neck of the woods. Here in Ankeny, Iowa my wonderful friend Lori Craig will be teaching the Standard and Intermediate Certification as well as the new Copic Flowers class. These classes run June 3rd-4th.

Also Debbie Olson is starting off the workshops in Milwaukee, WI May 6th-7th. These are the first workshops of the 2016 season and include, More Whimsical Faces and Hair, Vintage Values and Monotones, and Dress for Success – Clothing and Accessories.

If yo would like to read more about any of the classes or check the schedule for the rest of the 2016 class season check out all the information at Imagination International, Inc.

Hope you see a weekend happening near you, or near enough to schedule a fun filled weekend of coloring!

I’ll be back on the road in June as I head to San Diego to teach workshops, I promise I will give you a heads up!

Have a Happy Colorful Day!

Posted on

Creatures of Amalthea

As a high school art student I LOVED fantasy art, the magic of mythical creatures as well as the intricate detail and vivid, rich colors. Imagination International, Inc. is now housing an amazing drawing program for young and old featuring some breathtaking creatures.

Artist Terryl Whitlatch created a world of amazing creatures and is sharing them with all of us.  Not only is she sharing them she is teaching us how to create them ourselves.

On the III website you can go right into Creatures of Amalthea and learn how Terryl creates her creatures, from her story lines and animal inspiration to building her creatures from the bones up. She takes into consideration the smallest details of the how and why of each animal and how they will need to be structured to not only survive but thrive in their own habitats.

I decided to give it a try and picked out one of the 12 animals, the Esquilina, then stepped through the detailed, step by step drawing steps and then tackled coloring my Esquilina in a lengthy list of Copic markers.  I want to share the progression but I am not giving all the steps or the instructions because I want you to check it out in person! HERE

TOA2

TOA3

TOA4

TOA1

TOA5

TOA6

TOA7

TOA8

TOA9

Worried that you “can not draw”? First off I am not buying it, anyone can learn to draw with the right instructions, BUT Terryl even has line art of all of the Amalthea creatures, so you can print them off on your favorite Copic paper and use the steps to color them up.

Now my daughter is chomping at the bit to try one on her own too! In addition to extensive lessons on the creation process, drawing and coloring each of the 12 creatures featured. Imagination International, Inc. has created programs to go along with these lessons to be used with students in a school setting, after school programming and even week long camps.

Honestly I was thrilled to share the program having been an art educator myself and LOVED creating my Esquilina.

Thank you so much for stopping by to take a look!

Have a Happy Colorful Day!


Posted on 97 Comments

Hero Arts Blog Hop

Hippy Hopping today with Hero Arts!

MMH_logo_1000x1197

Hero arts asked if the Copic team would like to play along for this month’s My Monthly Hero March 2016 kit and I said “Yes Please!”

The kit is FULL of fun stuff: 12 coloring cards on XPressIt paper, coordinating stamps and dies, an Intense Black ink cube (alcohol marker-friendly), extra XPressIt paper, assorted notecards, and a package of gems.

MH104-Web-Image


There are even add ons to make your kit go further!

DC184 Ribbon Messages Stamp & Cut: https://heroarts.com/shop-sidebar/dc184-ribbon-messages-stamp-cut/

DC184
CL964 Marianne’s Flowers: https://heroarts.com/shop-sidebar/cl964-mariannes-flowers/

CL964
PS755 Coloring Foundation Book – Flowers: https://heroarts.com/shop-sidebar/ps755-coloring-f…ion-book-flowers/

PS755

I played with two of the coloring cards that came in the kit. Here is the first:

I added a sentiment right onto the card with one of the optional Ribbon messages and because the ink that came in the kit works with my Copics I colored the whole image up and got it on a card base wa-la! I used a lot of coloring tips that Marianne Walker shares in her Coloring Flowers Book.

Hero6

Here is a close up, I added a little bling to the letters and dragonfly wings with a atyou Spica pen but it is hard to see 🙂 Copic Colors Used: B41, V12, V04, V17, G20, G21, G24, G28, YG09, B99, BV20, C0, C1

Hero7

My next card I created with another coloring card and this time added not only a sentiment but stamped some of the matching flowers on one of the blank sheets of paper as well.

Hero2

I fussy cut and popped everything up and yay, another quick and easy card! Copic Colors Used: YG01, YG03, YG07, YG09, BV00, BV02, V12, V14, Y21, Y35, Y28, YR14, YR18

Hero4

Hero5

But I am not the only one playing along today make sure you stop by the other fun stops along the Hero Arts hop today!

https://heroarts.com/my-monthly-hero-is-here-5/ The Hero Arts Blog
http://ilikemarkers.blogspot.com/ Marianne Walker
http://paperfections.typepad.com/paperfections/ Sharon Harnist
http://onehappystamper.typepad.com/ Cindy Lawrence
http://loricraig.blogs.splitcoaststampers.com/ Lori Craig
http://debbiedesigns.typepad.com/ Debbie Olson
https://scrapweaver.com/ Michelle Houghton
https://marianagrigsby.wordpress.com Mariana Grigsby
http://stampinlibby.blogspot.com/ Libby Hickson

Make SURE to check the Hero Arts Blog for the details on some prizes as well! Yay Prizes!

Have a Happy Colorful Day!

Posted on

Copic Certifications and Coloring Flowers Workshops

I have just updated all the current OPEN Certification and Coloring Flowers Workshops. All are open through April, we only have 2 locations left in May after these classes so check them out and see if we are in your neighborhood or a near by state :-). Check out the dates, times and locations in my sidebar or HERE, or at the Imagination International, Inc. site HERE

Copic-ColoringFlowersManuelArt-9-24-1521087

Then in May we also start adding a few more Workshop classes. If you missed them last year the More Whimsical Faces and Hair, Vintage Values and Mono-Tones and Clothing and Accessories Workshops are coming around again so make sure to catch them when they stop near you! I will post again when these classes start opening up!

blog 3blog5

Hope you are having a happy Colorful Week!