Posted on

Start with the best!

I do a lot of art. I mean a lot! It is my job, my hobby, my passion. What I realized is that all of it starts with the same product, a pencil! Wether I am finishing with watercolor, ink or of course COPIC I start with pencil. I spend hours doing sketch work for stamp ideas, layouts for scrapbooking, lettering and, card making. All of this work is done in pencil.


This past year when visiting Imagination International, Inc.’s home base in Oregon Marianne Walker steered me to the “best” pencil out there. She said I needed the best and that this pencil is the “ONE”.

ar85305

After having worked with my Aristo pencil over the past year I have to agree, this pencil is the bomb!

Let me count the reasons I love my Aristo pencil:

  • Available line width: 0.5 mm, 0.7 mm, 0.9 mm & 1.3 mm
  • Triangular rubber grip zone
  • Fully retractable metal writing tip • Metal clip
  • Removable ‟Maxi” eraser with rounded metal push-button
  • Equipped with HB-leads
  • Barrel colors metallic-blue or matte-silver

It feels great in my hand and really is my go to tool. I use it to begin everything I do.

ARISTO

If you are interested in giving Aristo a try, check out their whole line of pencils at Imagination International, Inc.  pick out the perfect pencil for you and don’t forget extra lead and erasers to boot!

Have a Happy Colorful Day!

Posted on

New Tape Runner!

I will admit I am slightly addicted to tape runners. I have tried the best and the worst, the biggest and the smallest, permanent and movable, reusable and disposable. Some have been very successful others have been disasters. Many of my scrapbooking friends know that pinching pennies for about 6 years during med-school and residency I created hundreds of pages with a double sided tape that after about 5 years had started to loose it’s tack. Yes I have HUNDREDS of pages that are literally falling apart! I have not yet braved the process of going through and trying to re-attach EVERYTHING. I know it will all eventually fall off the page, but I just can’t bring myself to do it.

So I have settled into some better brands and was thrilled this past January, while working at CHA to discover that X-Press It has come out with a tape runner. I love their glue pens and their foam tape so I was very excited to see what they had come up with. (I like their double sided tape as well, I just prefer a dispenser.) Lucky me Imagination International, Inc. is carrying them so I get to play!

Copic-ColoringFlowersManuelArt-9-24-1521169

So here is what they thought about AND why I am loving it!

  • Extra-strong permanent adhesive – so far so good, adhering paper, ribbon twine…
  • Acid and Solvent Free – a must have for crafting
  • Heat Resistant – added bonus if embossing or ironing is needed
  • Smooth application that doesn’t “gum up” – no gummy lumps, yes please!
  • 1/3″ wide x 13 yards – for a tape addict gotta love the longer length
  • cover for runner is attached, swings and locks out of the way – no loosing it on my desktop or in my bag
  • lift and break tape – no stopping and pulling, no holding a trigger, just happy where you want it and lift away, no brainer
  • solid strip of tape – no dots or dashes and still breaks away when you int away from the paper

Today I was busy making cards for a local class and the new X-Press It the runner came through with flying colors all 4 cards are ready to go. Nothing fancy but all together and check off the to-do list. Thank you X-Press IT!

card 1

card 2


card 4

card 3


If you are interested in the tape runner check it out HERE. If you are interested in my local class check it out HERE.

Have a Happy Colorful Day!

Posted on

Pen and Ink taking me back to high school!

Imagination International, Inc. as many of you know not only carries Copic. (gasp) Yes I know hard to believe that there is OTHER art mediums worth playing with, but I am an equal opportunity artist and I LOVE to play! One of the newer additions over at III is dipping pens and ink.

I have to tell you this takes me back to my high school days! No Sharpie markers for us, no sir! We had to use dipping pen’s and ink for cross hatching, pintails and doodling, really anything that was rendered in ink. I’ll be honest the extra time it took to dip the pen every 30 dot or so of a larger pointillism piece was a little wearing at times but the results…magnifique! I was really excited to be given the opportunity to play with an pen and ink set again. Especially now when I can appreciate the value of the quality ink and wonderful pen nib.

blog ink1

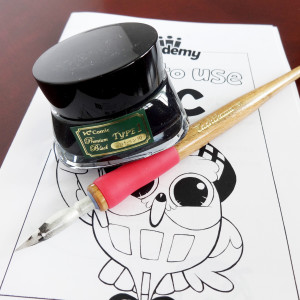
I ended up with two styles of nibs or more specifically the same style but in two different materials, ink and a very fun instruction manual. The instructions served as wonderful reminders and I learned quite a bit about the carrying nibs and why I might what a few more in different styes. The ink also comes in a wide range so if I really continued to explore I could do more there as well.

So I started by hooking up one of my nibs into the holder and doing some experimenting with the two different nibs that had arrived.

blog ink 2

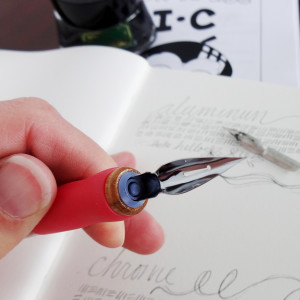
The holder has a slot in the end that the nib slides down into easily and then is just pulled out and changed when needed. (The instruction manual talks about how deep to dip the nib, how to hold the pen and how to clean the nibs as well.

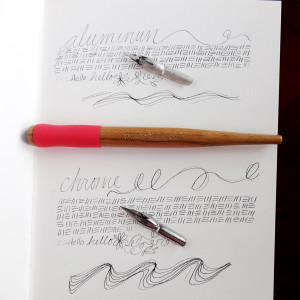
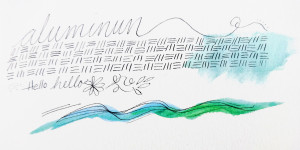
I started with the aluminum nib, both of mine are “spoon” nibs No. 600EF by Tachikawa. I dipped and started doing some writing and then dipped a second time to see how long I could go with a single dip. I did cross hatching until the ink ran out, you can see here how long it lasted. Then I dipped again and added a few doodles.

I did the same with chrome nib in the very same size and style to see if there are differences. Just as a note I am working on a rough sketch paper today, not a smooth cardstock, so you will see some bleeding of lines that would not be there on a paper with a tighter tooth.

blog ink 3Next I wanted to experiment a little with color so the chrome sample got some Copic love. I did have a little bit of bleeding with my lightest color. This could be because I did not wait quite long enough for the ink to dry. It could also be because of the toothy paper I am using. It would need a little more testing on my part if I want to use it regularly with Copic.

blog ink 5

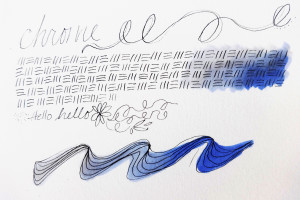
Then the aluminum sample received some watercolor. It held fast and was really what I figured would be what I worked with today anyway.

blog ink 4

On to my project, this is a page I started 2 years ago on a trip to Alaska with my family. I created a short art journal that I shared on-line but have never completed the last 3 days/pages. I started with a very light sketch in pencil, and then I went over my lines with the dipping pen and ink.

blog ink 6

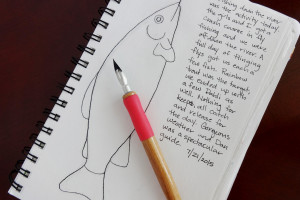
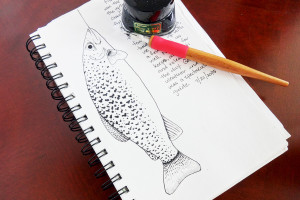
I erased the pencil and had no smudging (Yay) then added all the detail to my Rainbow trout with the pen and ink.

blog ink 7

I could have left him here, I really do like him just as he is, but I wanted the effect of the gorgeous colors on the fish so I added water color over my ink.

blog ink 8

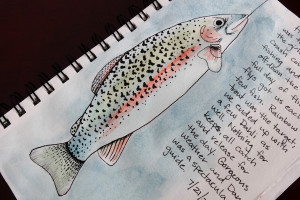
TA-DA! All complete. I do love how he turned out and loved working with pen and ink again! Thank you Imagination International, Inc. You can find more information about the complete line of products available HERE.

Have a Happy Colorful Day!

Posted on

Shading Objects and Creating Depth with Copic Workshops

The Copic Papercraft Team get’s asked frequently, “What is that Vintage Values and Mono Tones class all about? I really don’t do vintage images and don’t want to color things mono tone so why would I take the class?”

Well here is the answer!

When the Copic team designed the Vintage Values and Mono Tones class we were listening to YOU! We take the public’s input very seriously when we design our classes and one of the most frequent requests is for information on creating consistent light source and shadows on objects. Once an artist discovers the magic of Copic and figures out the basics of blending the colors they are ready to tackle shading and shadowing, but where to start?

Enter Vintage Values and Mono Tones!

Blov Vintage

This class is all about using shading to create that three dimensional look we are all trying to achieve. We start class with a quick discussion of why tackle mono tone images, how it will help, and how to begin looking for that illusive light source.

We practice creating a consistent light source on a variety of images, creating a cheat sheet we can come back to later.

We move on to color 4 images from start to finish, creating rich depth and contrast with a limited color palette to really hit home the concept of consistent, strong light on an object.

blog 4

This past year and a half this class has been the unsung hero of our teaching schedule. We have more light bulbs going off and more “ahh ha” moments in this class then in any other we teach. They value the information received in workshop weekends, and they leave feeling much more confident with creating shape and depth on a wide variety of images.

A side bonus of the class is our exploration of the incredible range of Earth Tones! Who knew that the Copic Earth Tones had such breadth of color…well we did and we are crazy excited to be spreading a new love and appreciation for this large color family!

E

We still have several locations this year where the Vintage Values and Mono Tones class will be visiting and there will even be some lucky locations in 2017 that still have the opportunity to catch this information packed class. Check out the remaining 2016 schedule HERE and come join us!

Posted on

Manga Comics Anyone? Yes You!

So if you are a Copic fan you might know what Manga is:

MANGA
(ˈmaNGɡə/)
noun
 a style of Japanese comic books and graphic novels, typically aimed at adults as well as children.
Not necessarily your style? I beg to differ! Imagination International, Inc. has an amazing Manga program called iiiAcademy and it is for EVERYONE. The iiiAcademy is in comic book style and they even teach you how to read them!
how_to_read_v2
Then each “comic” or episode tackles another Manga issue, and here is the best part, the lessons are completely applicable to anyone learning to work with Copic markers, inks, and other products carried by III.
How about a lesson on which paper to use?
m1_e3_desktop_5&6_v2
Or possibly how to refill your markers?
 m1_e9_desktop_3&4
Of course there are several lessons about how to color with Copic markers. I was particularly excited to see a few drawing lessons as well!
 m1_e5_desktop_p1&2
There are even a few free line images you can print and color to try your new skills on. And as a bonus there are short Japanese lessons you can download with each episode as well. You don’t need to read Japanese do not worry! This is really just a fun addition.
Screen Shot 2016-06-28 at 7.38.15 PM
This is another piece of Imagination International, Inc. just screaming to be explored. My daughter and I are both excited to do more learning and playing with Copic!
So I have not tried anything of my own creation yet but figured I might as well color one of the downloadable line art images!
blog iii Academy 2 Blog iii academy

 Come check out iiiAcademy, I know you will LOVE it!

iiia_transparent2