Posted on

X-Press It Foam Tape

So I am a bit of a foam tape junkie. Love the stuff, love to pop up elements on cards and scrapbook pages. The X-Press It Foam Tape makes it easy.

blog tape 2

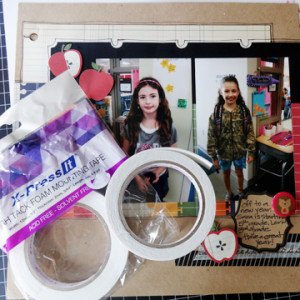
I used to buy all kinds of dots and squares, and I just got frustrated with all the waste. The squares were the wrong size, the circles have all the extra scraps around them. Any way I just found myself cutting them all to pieces to suite my needs anyway. I love the tape from X-Press It because now I just cut off exactly what I need in the shape I need it and don’t waste any.

A week and a half back I actually got to go on a scrapbooking weekend! The first in a year and a half and a scrapped three days away! I used my X-Press It Foam tape a lot. Here are some of the results: (These are all from the summer and fall of 2013, boy my girls are growing up!)

blog tape 7

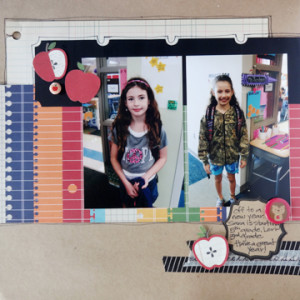
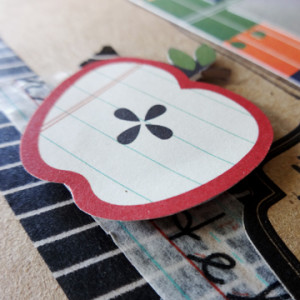
Here is a close up of the little apple elements I fussy cut then popped up. They were a perfect accent for the page and the detention made them shine a little more then the flat paper would have made them. I love that I could even trim a tiny piece to fit up under the leaf.

Blog tape 1

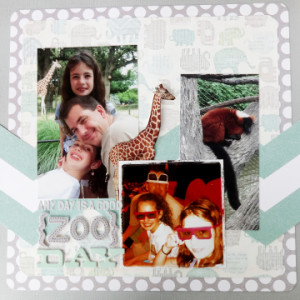
Then of course a zoo page. I have one of these about every 3-4 months in my albums. Our family always LOVES the zoo. we just wander and enjoy the animals. I try to select only a couple photos from each time we visit since we go so often and the giraffe was a highlight of the day. so I fussy cut him and his neck and head pop up above the page. I love the tape to run along his neck supporting the entire length so the photo will not get smashed when I add it to my album.
blog tape 3

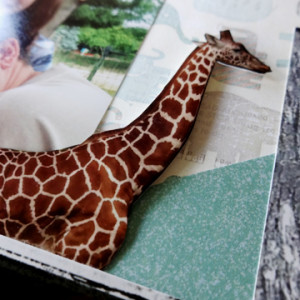
Here is a close up of Mr. Giraffe:

blog tape 4

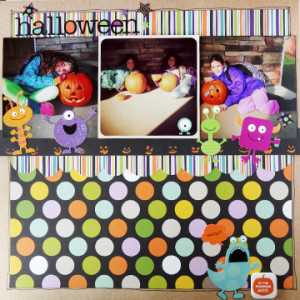
Lastly a series of Halloween photos, all are 4″ x 4″ so they fit across a 12″ x 12″ page perfectly, but then they all run together. Solution, pop up the focal center photo. And with the X-Press It Foam tape you can use nice long strips to support the edges and center of the photo.

blog tape 5

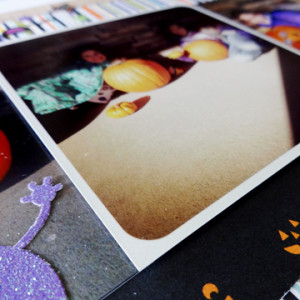
Here you can see the dimension a little better, this one was hard to get a good shot of, but it makes a big difference in the layout.

blog tape 6

the trip was a HUGE success 44 pages complete and OH SO MUCH FUN WITH FRIENDS. I ate too much, laughed too hard and enjoyed way too much. Always good to come home to the family and look forward to the next time 🙂

If you are a crafter that loves the pop up effect you will want to check out the X-Press It Foam tape. Scrapbooking, card making and general crafting I know it is a staple in my tool bag.

Have a scrappy kind of week!

Posted on

Only 3 Certification weekends left!

There are only 3 Copic Certification Weekends left in 2016! Philadelphia, PA May 13-14, Sacramento, CA May 13-14, and right in my back yard in Ankeny, IA June 3-4.

Copic-ColoringFlowersManuelArt-9-24-1521087

Then we move on to Copic Coloring Workshops! Debbie Olson is the first out of the shoot this weekend in Milwaukee, WI! She follows up with another weekend in Grand Rapids, MI June 3-4, Cindy Lawerence is rocking Buffalo, NY with her talented coloring June 3-4 as well and then I am flying out to gorgeous San Diego,CA for a weekend of Copic fun June 10-11.

eye

If you would like more information you can check it out HERE, or in my sidebar.

Hope you can find a weekend near you that you can join us for Copic coloring fun!

Have a Happy Colorful Day!

Posted on

Intro to Copic Coloring

In the past I have shared about the book series being written by Marianne Walker and Imagination International. Her first in the series was Coloring Flowers with Copic and then Faces and Hair. The next is a bit of a re-wind, going back to Intro to Coloring with Copic Markers. It gives a lot of basic information about Copic markers and the how and why they work. It, like the other books, includes a whole section of images by Marianne that are for the owners use and practice.

The book also includes a whole slew of techniques that go beyond basic blending. Thank you Marianne! I tackled some clear glass leaning on the techniques found in the book. I want to try it again, like anything it takes some practice, but here are my results:

Blog Intro

I also decided instead of photo step outs it might be fun to video the process so here you go!

You can find the Intro to Coloring with Copic Markers at Imagination International Inc. and other Copic carriers!

Have a Happy Colorful Day!


Posted on

Gasenfude…WHAT?

No I am not learning a new language, believe it or not there is a brand new pen out from Copic! It is a nylon brush pen that is compatible with Copic inks! Yippee Skipee, let’s play!

Now let me share first and foremost that the new Gasenfude pen has it’s own learning curve and needs as much practice to master, maybe even more then your Copics depending on what yo would like to do with it.

Here are the details before I show you my play time:

  • Archival
  • 9 mm long bristles
  • 3.1 mm diameter at brush base
  • Water based, black pigment ink
  • Sturdy, genuine nylon bristles
  • Superfine point for detail work
  • Long, flexible bristles for dry-brush effects
  • Copic compatible ink (will not bleed with Copic markers)

Good stuff right?! So I decided to challenge myself and try my hand at some brush script. It is all the rage you know and really how hard can it be? (She says to herself with some confidence) I’ll be honest, harder then it looks, and took more practice then I anticipated. But like any new adventure oh so very fun! Here is the breakdown of what I ended up with.

Blog 1

Take a closer look at the pen, I’ll check the spelling 🙂

Blog 2

This shot gives you a closer look at the long nylon brush nib.

Blog 3

It flexes even further then the Super Brush Nib on the Copic Sketch markers. Practice Practice!This style of lettering is ALL about pressure. Press down to get thicker lines, ease up to get thinner lines. Speed is a HUGE factor as well, keep it slow, I mean SUPER SLOW!

Blog 4

I started with a lot of individual letters. For time, I focused on letters I knew I wanted to use. I looked up a couple different styles on line to get some ideas, but ended up using a style that is mostly my own handwriting.

Blog 5

Yep more practice! and now focusing in on words. Some of my letters link like a cursive style others do not connect, like a standard print. I worked on lined paper and also did some work in pencil first to look at where I wanted thicker areas on each letter.

Blog 6

Now on to a project. I am going to add labels to my Copic portfolios. I pulled out the paper from the sleeve around the binding to get measurements. I used a pencil, clear ruler, paper trimmer and bone folder.

Blog 7

Here are my labels cut, folded, with guide lines and very light writing to give me a better shot at spacing.

Blog 8

Next ink it up with the new Gasenfude and erase all the pencil lines after the ink drys. I couldn’t resist making a couple of extra little tags with the scrap paper.

Blog 9

Best part of Gasenfude…compatible with Copic ink! Yay! Color, color, color!

Blog 10

Yep loving it, takes practice and patience, I am not there yet, but I am loving it!

have a happy colorful week!

Posted on

Copic Calendar Updated 4/6/2016

I just updated all the Copic Classes that are open across the US and Canada. There are more to come, but these are the classes that are currently open for registration RIGHT NOW.  Check them out in my side bar or HERE is a direct link.

Two weekends to take special note of (they are all important, but these two are worth mentioning). One there is a brand new Certification weekend added to the calendar in my neck of the woods. Here in Ankeny, Iowa my wonderful friend Lori Craig will be teaching the Standard and Intermediate Certification as well as the new Copic Flowers class. These classes run June 3rd-4th.

Also Debbie Olson is starting off the workshops in Milwaukee, WI May 6th-7th. These are the first workshops of the 2016 season and include, More Whimsical Faces and Hair, Vintage Values and Monotones, and Dress for Success – Clothing and Accessories.

If yo would like to read more about any of the classes or check the schedule for the rest of the 2016 class season check out all the information at Imagination International, Inc.

Hope you see a weekend happening near you, or near enough to schedule a fun filled weekend of coloring!

I’ll be back on the road in June as I head to San Diego to teach workshops, I promise I will give you a heads up!

Have a Happy Colorful Day!